Last week I shared the last finished patches of my
Christmas project. It didn’t
take much time to find a nice layout for my wonky
patches. I pinned notes on
the patches to make sure I would know how to sew
them together.
It only took me one evening. As you can see there
were a few bigger gaps between the patches. I didn’t want to hide them, but had
no idea what to do.
So I flipped through my embroidery books and found
a chapter about insertion stitches in Mary Thomas’s Dictionary of Embroidery
Stitches. This would be a great way to decorate the gaps and strengthen the
quilt. It was the first time I tried this technique, so I did it by the book.
First I attached a piece of cardstock at the backside with tacking thread.
This would keep the patches in place when I
stitched the insertion stitch.
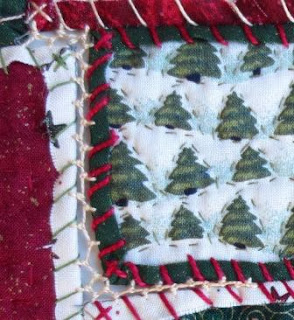
First I filled the small rectangle at the left
side.
I stitched knotted insertion stitch AKA knotted faggot stitch in perle 5.
This stitch
is similar to Antwerp edging, which I already knew. Apart from
stitching without a hoop, it was quite easy.
Then I stitched the second gap, which started small
at the left side and becomes wider to the right. Here I stitched knotted
insertion stitch in cotton a broder from right to left.
The next gap was tricky, it had a Z-shape.
I decided to use the knotted insertion stitch again
and make two corners.
The thread is perle 8.
This last gap was the biggest, ½ x 1 ½ inch. Too big
for a normal knotted
insertion stitch.
So I added buggle beads while I stitched the
knotted insertion stitch in cotton a broder. Before securing the thread, I took
it through the beads again to keep them in place.
I didn’t had time to make a label and stitch my
info. But I knew I had some pre-printed labels in the back of my cupboard. I
wrote my info with a permanent marker and stitched the label to a false backing
with a running stitch in cotton a broder.
Then I appliquéd the false backing to the backside of the quilt and sewed a hanging sleeve.
So here it is, all finished in time for Christmas.
I just love the wonky look of it!
This quilt only took me one month from start to
finish. It's 17 inch wide at the top and 22 inch high in the centre (about 43 x 56 cm). Here I wrote about the start with a link to Teesha Moore, who inspired me to
make this quilt. I wrote about the patches here, here and here. You can also take a closer look at this quilt and the patches in my Flickr album Christmas inspired by Teesha Moore.
More info about Work In Progress Wednesday at Pin Tangle.


This turned out so well! An amusing little hanging that brings together the fun and joy for the holidays.
BeantwoordenVerwijderenI think you have enjoyed making this quilt. Teesha Moore's idea was new to you, you solved a number of problems and learned and mastered insertion stitches. The result is a lovely wonky quilt.
BeantwoordenVerwijderenHappy Holidays!
great way to join the blocks, the wonkyness looks lovely . Reminds me of when I was at school and had to make a petticoat as part of an exam piece, the seams all had to be joined using insertion stitch, have not got a clue what happened to it!
BeantwoordenVerwijderenGreat way to join the blocks, thanks for the inspiration!
BeantwoordenVerwijderenA brilliant design, the quilt has come together beautifully, the insertion stitches have worked perfectly!
BeantwoordenVerwijderenI like it, it looks like a group of Christmas packages.
BeantwoordenVerwijderen